Do you like interactive cards? Some of them are SO cool, but very intense to make! You know I’m all about EASY cards, so this pop up card is totally interactive, but super simple to make. You will love it!

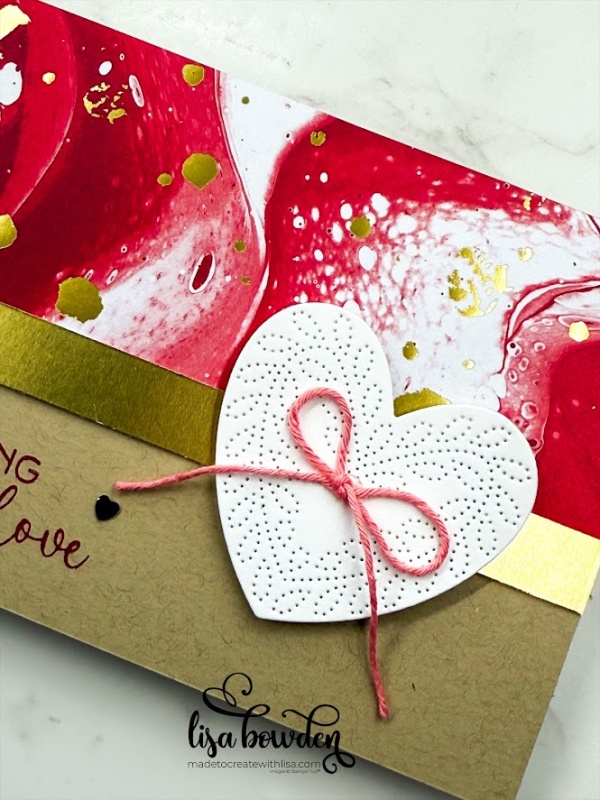
I used the gorgeous Hearts of Elegance stamp set and coordinating dies, along with the Marbled Elegance Designer Series Paper (DSP) by Stampin’ Up! to make this card. The paper pack is GORGEOUS, with all of that gold foil marbled into the design! I added some regular gold foil cardstock to the card, as well, to pull out even more gold in the finished product. I love how it turned out!
PLEASE CLICK HERE to watch the video where I made this card. You can see exactly how to put together the pop-up portion of the card, which is the key to it all!
I started out with 2 pieces of Crumb Cake cardstock, measuring 4-1/4″ x 5-1/2″. Both of these pieces are scored at 3/8″ when you have the short side facing up on your Paper Trimmer.
Now, turn one piece horizontally, so that the score line is at the TOP. Adhere a piece of the DSP to the top of the card (directly beneath the score line), measuring 2-1/2″ x 5-1/2″. Now, layer a small strip of the Gold Foil cardstock on top of that, measuring 1/2″ x 5-1/2″. Stamp the sentiment, from the Hearts of Elegance stamp set, onto the card front as pictured, using Real Red ink. Finally, die cut out one of the gorgeous hearts from the matching die set, using Basic White cardstock, and adhere it on using Stampin’ Dimensionals.
I added a Flirty Flamingo twine bow onto the heart, which is from the Baker’s Twine Three Color Pack. I adhered this with a Mini Glue Dot, which is my favorite adhesive to use when putting bows onto my cards!
After decorating the front of the card, fold along the score line at the top of the card, and add Tear & Tape adhesive to it (on the front side, right above the DSP). Peel off the adhesive protector, and you’re ready to add the hearts.
I used Window Sheets (acetate) for these pop-up hearts, which worked perfectly. I cut myself 6 strips of acetate, measuring 1/2″ x approximately 4″ (they will be all different lengths in the end, so the length doesn’t exactly matter). Using Mini Glue Dots, adhere the die cut hearts to the acetate strips (you can see how to do this in the video here), and then lay the strips onto the top of the card where the Tear & Tape adhesive is. I put my hearts at all different lengths, which looks really cool.

Now, fold the other piece of Crumb Cake cardstock along its score line, adding Tear & Tape adhesive to it as well, and “butt” the ends up against each other. Now, the ends of the acetate strips are enclosed into the middle of the card, and the hearts “pop up” when you open the card! Isn’t that SO cute!!

I decorated the inside of the card using another sentiment from the stamp set, using Real Red ink again, and also added a heart using Flirty Flamingo ink. The final touch was sprinkling on some of the beautiful, gold Heart Sequins, which tied everything together.
I hope you can catch the drift as to how to put together this darling card! I will definitely be making more of these, using different images that would be cool to pop up. It’s truly the coolest fun fold card to make!
Product List")
 Specialty Designer Series Paper")


Fabulous card . Great instructions. Many possibilities for other occasions
Yay!! I’m so glad you were able to follow the instructions. I try hard, but sometimes it’s hard to know whether or not it really hits home!! 🙂 I agree–pop-up cards are PERFECT fun cards for all kinds of occasions!! Thanks for being here!
Adorable card so just made one for my husband. I am just finding that the card seems too heavy and instead of sitting normally on the shelf, it keeps collapsing under its weight, maybe i have done something wrong?
First attempt though and it won’t be the last!
Yes, with all of the elements in the card, it does definitely get a little heavy! But it’s worth it!! LOL I’m so glad you made one…I think they’re SO fun!
This card is so lovely that I CASE’d it with only minor changes. Love it!
I’m so happy to hear that!! These pop-up cards are so fun to make. Thanks for reaching out!!!
Love this sweet card…lots of inspiration for other pop up cards Lisa!!!
Thank you for sharing
Thank you for being here, Yvonne!! I’m so glad you like it–pop-up cards are SO fun to make!!
I love, love, love IT! I’ll be trying it soon too. I’ve just discovered you on the Web and I do enjoy very much your creations! Thanks for the great inspiration!
I’m so glad you’re here, and that you found me! This card is so much fun–I definitely hope you give it a try!
Love this card and cannot wait to try it. Thank you for the video and measurements.
You’re so welcome! I’m glad you’re going to try it…it’s great! And really easy!
Is there any way to hide the opening on the top of the card where the acetate strips are cut off?
Also, can something be done to make the inside folded area look nicer? It looks like you added a different color paper or ribbon to the middle?
I didn’t add any paper or ribbon to the middle. I’m not sure…maybe you could figure out a completely different way to fold and score the cardstock? I hope you’re able to figure it out so that you like it!
Love this! Making it for my Mom! She’s going to love it!
The measurements were great!
Thank you!
Yay!! I’m so happy to hear this! I know it will turn out beautifully!
Thank you for your response. I did add a piece of folded paper on the top outside to cover the area where I cut off the acetate so it looked more finished and hid the acetate that was showing.