I made the CUTEST gift card holder today, using the brand new Birthday Celebration stamp set and coordinating Wildflower Birthday Designer Series Paper (DSP) pack! This paper pack is *ah-mazing*…and after you see today’s project, I think you’ll agree!
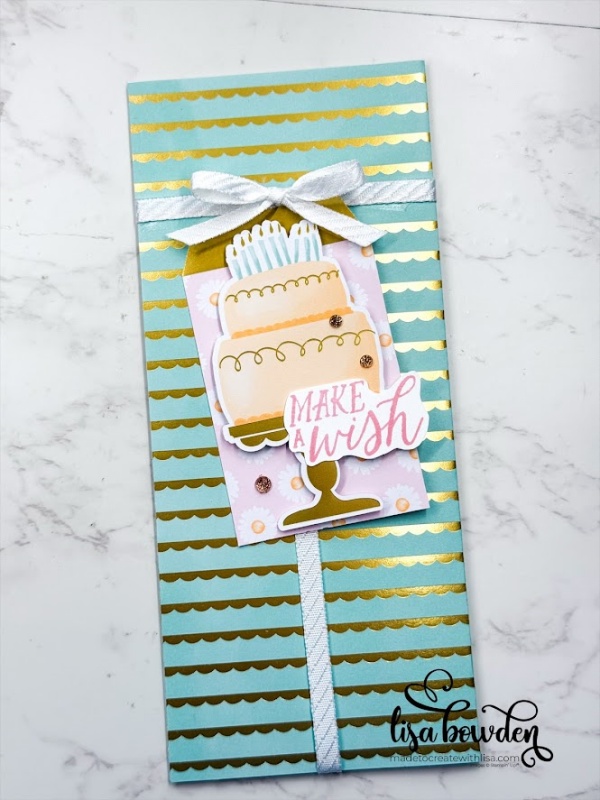
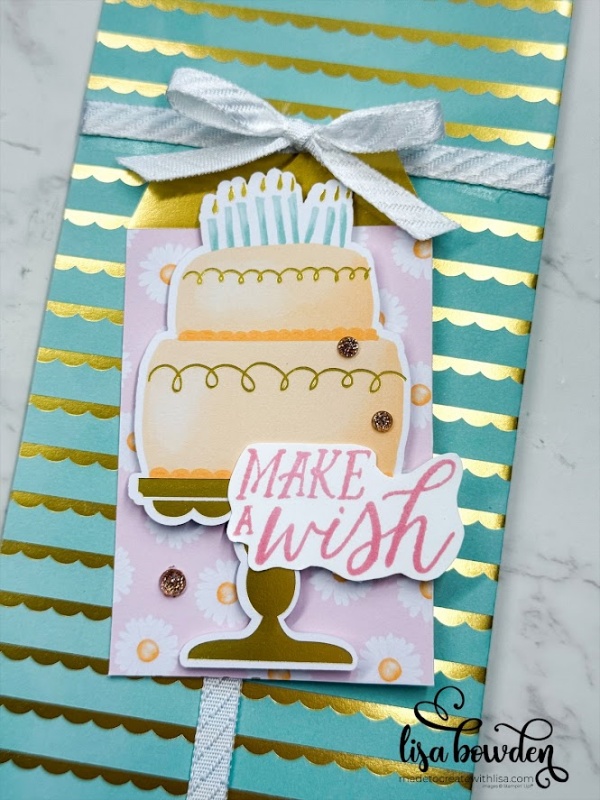
Not only does this paper pack have gorgeous paper that has gold foil throughout, but it also comes with 2 full sheets of pre-printed tags that you can cut out, ready to go! It also has 2 sheets of die cuts, which are ADORABLE…you’ll see how easy it is to punch these images out and decorate your project quickly and perfectly!
PLEASE CLICK HERE to watch the full video of how I made this project. The finished product is fantastic, and it helps to follow along with the video to see exactly how it is made.
I started out with a piece of junk mail! When you get a bill in the mail, do you still use the enclosed envelope to send back a check to pay your bill? I used to years ago, but I’ve been doing my banking and bill-paying online for quite a long time. I’m sure you do, too! So, why not put that enclosed envelope to good use, instead of throwing it away??
Every bill comes with differently-sized envelopes, so I’m not going to bother telling you my DSP measurements. Every envelope will be different. Take a piece of DSP (here I used the Wildflower Birthday DSP pack), and wrap it around the envelope after you have glued it shut (you can see this in the video). I adhered mine with Stampin’ Seal, which works perfectly.
After the DSP is adhered, cut off approximately 1-1/2″ off the top of the envelope, in order to create the pouch. You can cut off as little or as much as you’d like, depending on the look you’re going for.
Next, I used my Stampin’ Seal to adhere my ribbon around the “top” of my gift pouch, and wrapped it around the body of the pouch, as well. I tied a bow, and adhered that on top of everything using a Mini Glue Dot.
The tag was made using one of the tags in the DSP pack. The tag sheets are fantastic! They all have the cutest prints, it was hard for me to choose which one to use. I also loved looking through all of the die cuts to choose the one that I ended up using on the tag. I added the cake onto the tag using Stampin’ Dimensionals.
I added a piece of Pretty in Pink cardstock to tuck into the pouch, which I adhered to the inside of the lid of the box. I added my gift card, and then stamped the sentiment from the Birthday Celebration stamp set using Black Memento ink.

I also stamped a sentiment for the outside of the pouch, using the matching Pretty in Pink ink, and cut it out by hand. And after adding a few gems, the project was complete! I *LOVE* it!!
Product List")
 Specialty Designer Series Paper")


 Diagonal Trim Combo Pack")


What a great idea! Thank you Lisa. I just made one and instead of a gift card, I added concert tickets using temporary tape.
I LOVE that idea!!! Awesome!! And, thank you for sharing!! 🙂