Birthdays, birthdays, birthdays…so many birthdays!! And we’re always looking for a cute card to take to a party, or stick in the mail, right? I’ve got such a cute one for you today!
I pulled out the Bright & Beautiful Designer Series Paper pack (DSP), which is ADORABLE!!! It is full of such fun prints, I love every single one of them. And for this particular card layout, it features almost ALL of the different prints in the entire pack! It’s fantastic!

PLEASE CLICK HERE to watch the video where I made this card. I know you’re going to love it!!
I started out with a Basic White card base, measuring 8-1/2″ x 5-1/2″, folded in half. Layered on top of this is a piece of Azure Afternoon, measuring 5-1/4″ x 4″. And finally, on top of that, is another piece of Basic White cardstock, measuring 3-3/4″ x 5″.
But WAIT! Before layering this final piece of Basic White onto the card front, I decorated it all up!! It’s covered with tons of little strips of DSP, all different prints and colors. Each strip is only 3/4″ wide, and I cut a ton of them. If you watch the video, you can see which strips I started with, and then how I laid them out so that they stay straight. I adhered them to the card using Liquid Glue. After I made this first card, I made another one just like it. On that one, I used Stampin’ Seal adhesive, and it worked just as well!

After adhering all of the strips onto the Basic White cardstock, I turned it over and trimmed off the excess. THEN, I was able to layer this entire piece onto the card base. Doesn’t it look GREAT??
Using the Something Fancy dies, I cut out a larger layer with Lemon Lime Twist cardstock, and then a smaller die using Basic White cardstock. I stamped the “Birthday Wishes” sentiment onto the white piece, using Berry Burst cardstock. This sentiment is from the Simply Said stamp set, which is a fantastic set to have in your stash!
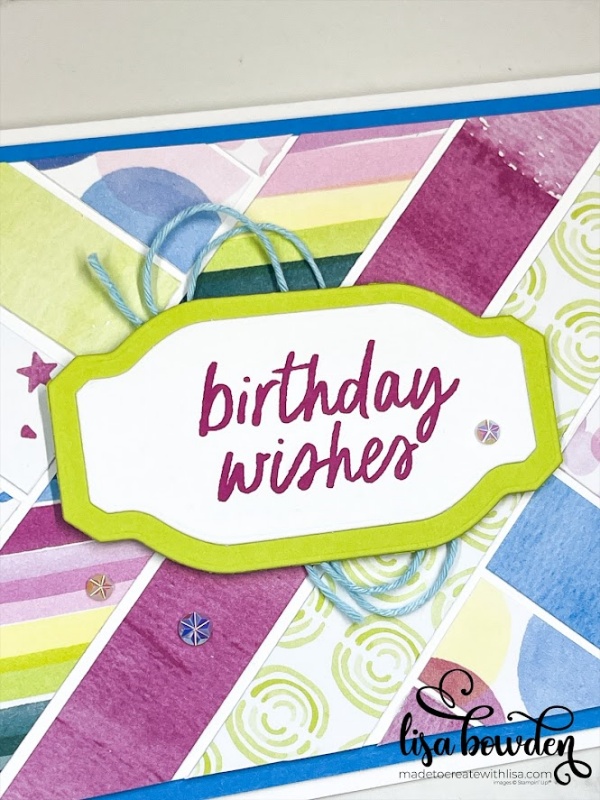
Before layering the sentiment onto the card base, I pulled out my Pool Party Baker’s Twine, and added a “swirl” of twine onto the card base. Then I layered the sentiment on top of it, using Stampin’ Dimensionals (you can see how I did this on the video).
Finally, I added some of the gorgeous, sparkly Iridescent Faceted Gems, which have quickly become one of my favorites.
I hope you’ll give this layout a try! It is SO MUCH FUN to make!!
Product List Designer Series Paper")


Leave a Reply