I *LOVE* the ripped paper look, and once you see this card, you’ll know why! It’s amazing!! I’m so glad this trend is back. There is so much texture you can add to your project by ripping the paper!
I have made so many cards using this technique, and it looks so good on every single one. I’ll link the others at the bottom of this post, so that you can check them out. Using different papers and prints for this effect is amazing!
PLEASE CLICK HERE to watch the video where I made this card. It’s such a good one! I use the exact same technique every time I make this layout. It’s easy, fun, and creative.
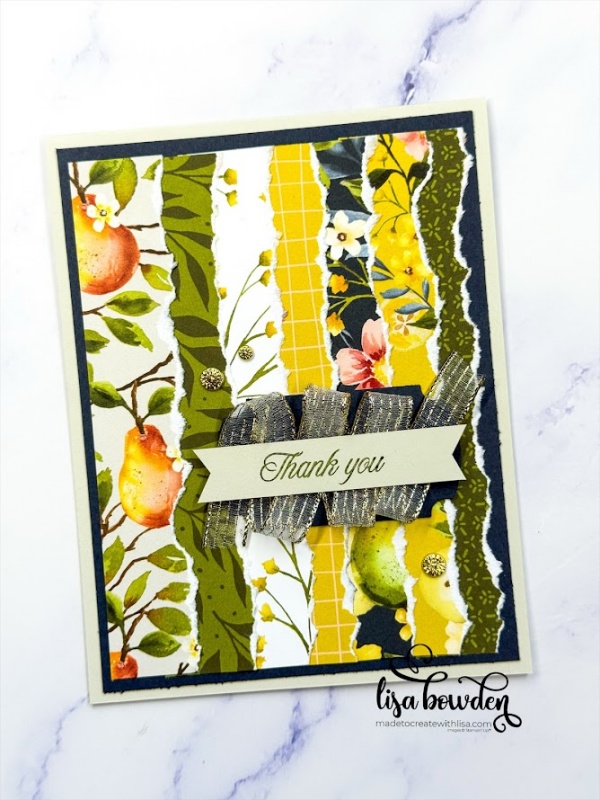
I pulled out the Painterly Pears Designer Series Paper (DSP) for this card, and cut out 7 strips that all measure 1″ x 5″. I ripped the right-hand edge of each of the strips, and then adhered them, slightly overlapping one another, onto a piece of Secret Sea cardstock. This piece measures 4″ x 5-1/4″.
After this was all adhered, I glued this to the card base, which is a piece of Basic Beige cardstock measuring 4-1/4″ x 11″ and folded in half. The colors of this DSP, especially when paired with the Secret Sea, contrast so beautifully on top of the Beige! I love it all!!
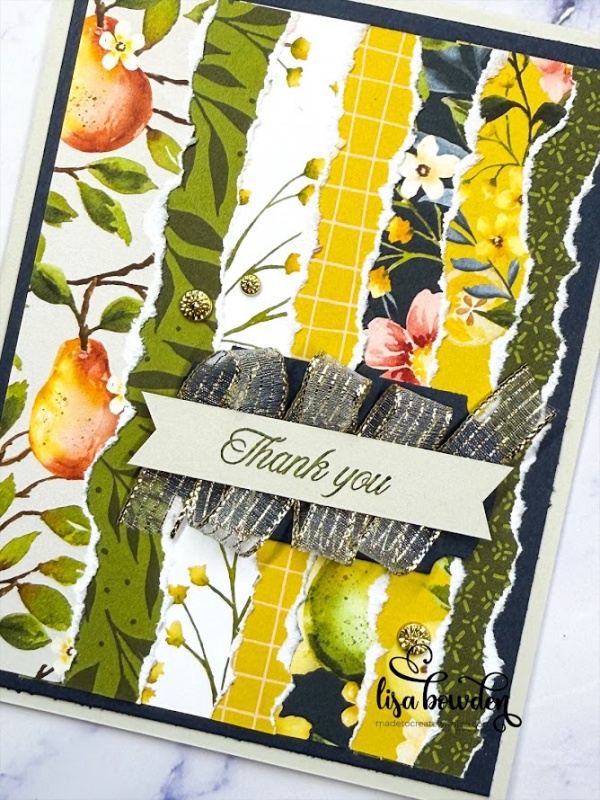
I punched out a piece using the Labeled with Love punch, using Secret Sea cardstock, and glued this directly to the card base using Liquid Glue. Then, I “zigzagged” a piece of the gorgeous Gold Striped Mesh Ribbon on top of that. I LOVE how this looks!
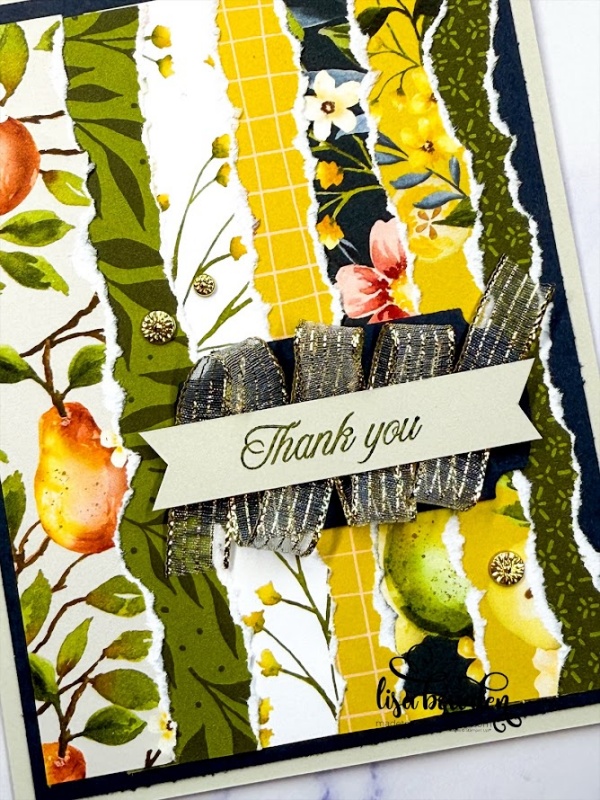
The sentiment is from the Perfectly Pears stamp set, and I stamped it using Mossy Meadow ink onto a 1/2″ strip of Basic Beige. I bannered both edges, and stuck this on using Mini Stampin’ Dimensionals. I finished the card by sprinkling on a few of the beautiful, shiny Flower Accents gems. They are PERFECT for this card!
PLEASE CLICK HERE to head over to another card I’ve made using this same technique. You’ll soon see how fabulous it looks with ALL different kinds of DSP! I love the ripping technique!
Product List![Perfectly Pears Photopolymer Stamp Set (English) [ 166147 ]](https://assets1.tamsnetwork.com/images/EC042017NF/166147s.jpg "Perfectly Pears Photopolymer Stamp Set (English) [ 166147 ]")
![Painterly Pears 12" X 12" (30.5 X 30.5 Cm) Designer Series Paper [ 166146 ]](https://assets1.tamsnetwork.com/images/EC042017NF/166146s.jpg "Painterly Pears 12\" X 12\" (30.5 X 30.5 Cm) Designer Series Paper [ 166146 ]")
![Secret Sea 8 1/2" X 11" Cardstock [ 165624 ]](https://assets1.tamsnetwork.com/images/EC042017NF/165624s.jpg "Secret Sea 8 1/2\" X 11\" Cardstock [ 165624 ]")
![Basic Beige 8 1/2" X 11" Cardstock [ 164511 ]](https://assets1.tamsnetwork.com/images/EC042017NF/164511s.jpg "Basic Beige 8 1/2\" X 11\" Cardstock [ 164511 ]")
![Mossy Meadow Classic Stampin' Pad [ 147111 ]](https://assets1.tamsnetwork.com/images/EC042017NF/147111s.jpg "Mossy Meadow Classic Stampin' Pad [ 147111 ]")
![Flower Accents [ 165171 ]](https://assets1.tamsnetwork.com/images/EC042017NF/165171s.jpg "Flower Accents [ 165171 ]")
![Labeled With Love Punch [ 163569 ]](https://assets1.tamsnetwork.com/images/EC042017NF/163569s.jpg "Labeled With Love Punch [ 163569 ]")
![Gold Striped 3/8" (1 Cm) Mesh Ribbon [ 165599 ]](https://assets1.tamsnetwork.com/images/EC042017NF/165599s.jpg "Gold Striped 3/8\" (1 Cm) Mesh Ribbon [ 165599 ]")
![Mini Stampin' Dimensionals [ 144108 ]](https://assets1.tamsnetwork.com/images/EC042017NF/144108s.jpg "Mini Stampin' Dimensionals [ 144108 ]")
![Multipurpose Liquid Glue [ 110755 ]](https://assets1.tamsnetwork.com/images/EC042017NF/110755s.jpg "Multipurpose Liquid Glue [ 110755 ]")

Leave a Reply