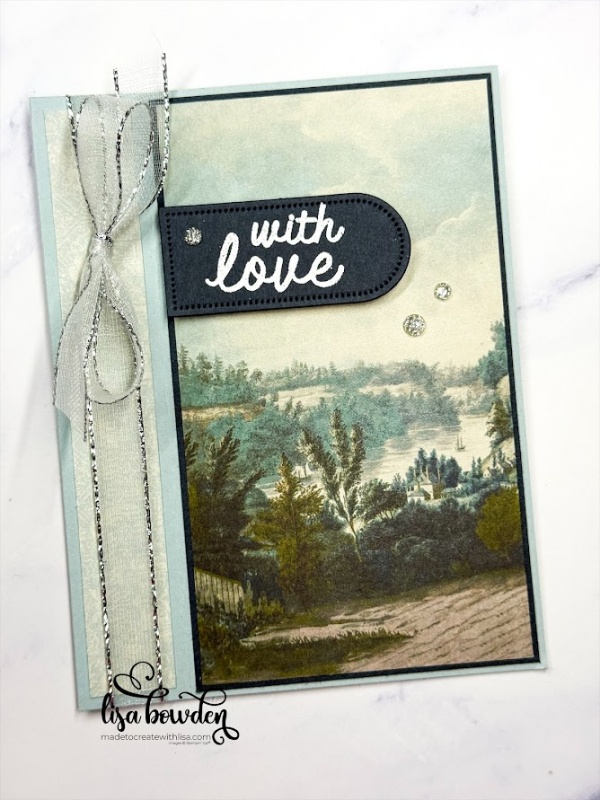
If you saw my blog post the other day, you’ll know that I had to make some sympathy cards this week for my cousins. My sweet uncle passed away a few weeks ago, and we traveled to Central Oregon this past weekend to celebrate his life together. What a precious man he was!!
I was thinking about what I wanted to use to make these cards, and I immediately thought of pulling out the new Beautiful Gallery Designer Series Paper (DSP) pack for this card. It’s a new pack that I hadn’t created with yet, and it has so many beautiful paintings, sketches, and scenery in it. I thought it would be perfect, and it was! I made 2 different cards using the exact same layout, just switching up the DSP prints.
This book binding style of card is a fun layout, because it makes the card “different,” yet it’s really not hard at all. PLEASE CLICK HERE to watch the video where I made this card. I really think you’ll like it.
I started off with a card base made from the new In Color, Cloud Cover. It is a gorgeous, VERY light blue color. It is almost grey. I love it!! This is a piece of 5-1/2″ x 8-1/2″, scored at 3-1/4″ and 4-1/4″. You’ll fold the card in half, and then fold it back on the other score line to create the “book binding” portion of the card (please see video).
The book binding portion was glued closed using Liquid Glue (my favorite!), but you could also use Tear & Tape adhesive here. On the card front, I used a piece of the gorgeous DSP for the binding portion. This piece measures 7/8″ x 5-3/8″. Then, on the larger portion of the card front, I layered a piece of Secret Sky cardstock, measuring 3-1/8″ x 5-3/8″ . Finally, I used that gorgeous scenery print for the main portion of the card. That piece measured 3″ x 5-1/4″.
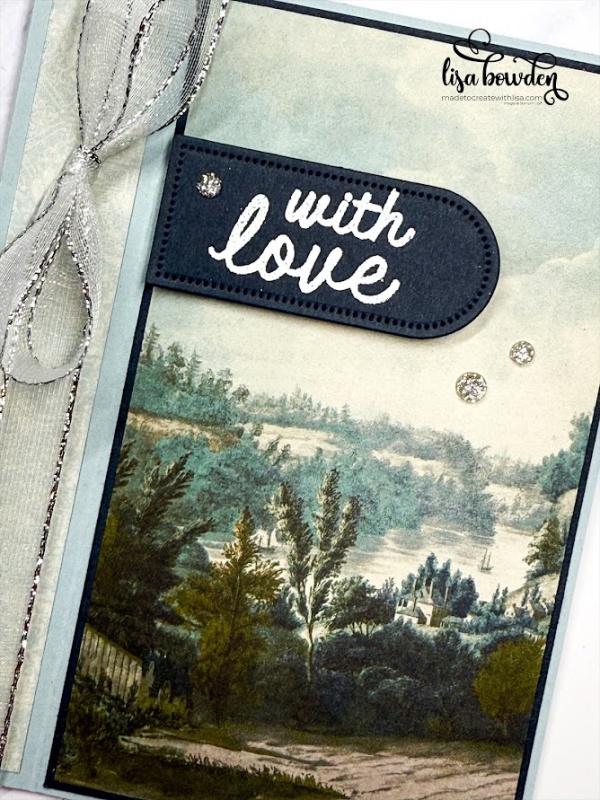
Have you grabbed the Everyday Arches die set yet?? They are amazing, and SO versatile! I used the smallest die from that die set for my sentiment, die cut out of Secret Sea cardstock. I heat embossed the sentiment onto it, stamping the sentiment from the Thankful Garden stamp set using Versamark ink. Then I sprinkled on the white WOW embossing powder, and heated it using my Heat Tool. I layered this sentiment onto the card front using Stampin’ Dimensionals.
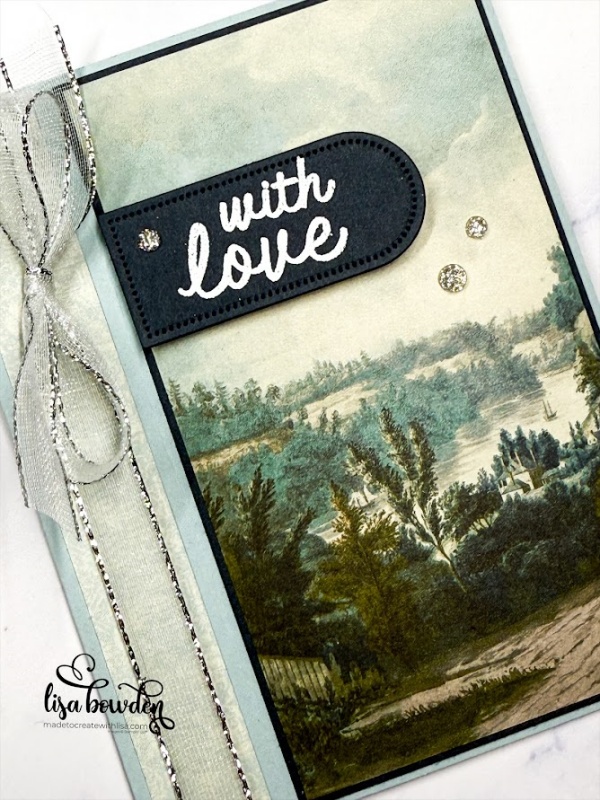
I tied the gorgeous, sheer ribbon around the book binding portion of the card, and the silver added the perfect, glamorous touch to this card. The Sparkle Gems finished it off perfectly, because the silver in the gems matched the silver in the ribbon. It looked way more gorgeous in person than it does in this photograph!
I hope you love this card. PLEASE CLICK HERE to hop over to see the other card that I made using this exact same layout and pack of DSP…it is equally as beautiful as this one!
Product List![Beautiful Gallery 6" X 6" (15.2 X 15.2 Cm) Designer Series Paper [ 165196 ]](https://assets1.tamsnetwork.com/images/EC042017NF/165196s.jpg "Beautiful Gallery 6\" X 6\" (15.2 X 15.2 Cm) Designer Series Paper [ 165196 ]")
![Everyday Arches Dies [ 164629 ]](https://assets1.tamsnetwork.com/images/EC042017NF/164629s.jpg "Everyday Arches Dies [ 164629 ]")
![Cloud Cover 8 1/2" X 11" Cardstock [ 165621 ]](https://assets1.tamsnetwork.com/images/EC042017NF/165621s.jpg "Cloud Cover 8 1/2\" X 11\" Cardstock [ 165621 ]")
![Secret Sea 8 1/2" X 11" Cardstock [ 165624 ]](https://assets1.tamsnetwork.com/images/EC042017NF/165624s.jpg "Secret Sea 8 1/2\" X 11\" Cardstock [ 165624 ]")
![Silver & White 1/2" (1.3 Cm) Sheer Ribbon [ 162149 ]](https://assets1.tamsnetwork.com/images/EC042017NF/162149s.jpg "Silver & White 1/2\" (1.3 Cm) Sheer Ribbon [ 162149 ]")
![Adhesive Backed Sparkle Gems [ 161288 ]](https://assets1.tamsnetwork.com/images/EC042017NF/161288s.jpg "Adhesive Backed Sparkle Gems [ 161288 ]")
![Versamark Pad [ 102283 ]](https://assets1.tamsnetwork.com/images/EC042017NF/102283s.jpg "Versamark Pad [ 102283 ]")
![Basics Wow! Embossing Powder [ 165679 ]](https://assets1.tamsnetwork.com/images/EC042017NF/165679s.jpg "Basics Wow! Embossing Powder [ 165679 ]")
![Heat Tool (Us And Canada) [ 129053 ]](https://assets1.tamsnetwork.com/images/EC042017NF/129053s.jpg "Heat Tool (Us And Canada) [ 129053 ]")
![Stampin' Cut & Emboss Machine [ 149653 ]](https://assets1.tamsnetwork.com/images/EC042017NF/149653s.jpg "Stampin' Cut & Emboss Machine [ 149653 ]")
![Paper Trimmer [ 152392 ]](https://assets1.tamsnetwork.com/images/EC042017NF/152392s.jpg "Paper Trimmer [ 152392 ]")
![Multipurpose Liquid Glue [ 110755 ]](https://assets1.tamsnetwork.com/images/EC042017NF/110755s.jpg "Multipurpose Liquid Glue [ 110755 ]")
![Stampin' Dimensionals [ 104430 ]](https://assets1.tamsnetwork.com/images/EC042017NF/104430s.jpg "Stampin' Dimensionals [ 104430 ]")

Leave a Reply